System Setup Guide
This document is designed for customers participating in the Software Development Platform for Intel® Data Center GPU Max 1100 Series program who receive the following system configuration:
D50DNP server with two Intel® Xeon 8480+ CPUs (Sapphire Rapids 350W TDP)
Two Intel® Data Center GPU Max 1100 PCIe cards (300W TDP each) with an Xe Link x2 bridge card.
The intent is to provide an end-to-end view of system setup and test content from the perspective of this specific configuration. This includes instructions for:
BIOS and operating system installation
Driver and tool installation
Readiness validation with example workloads
For simplicity, this guide focuses on Ubuntu. Intel GPU drivers support 3 baseline operating systems: Ubuntu, RHEL, and SLES. Other operating systems have similar steps.
For more information about the host system, see Intel Server D50DNP Family Technical Product Specification. Additional information about GPU is available in the Intel® Data Center GPU Max Series documentation.
Components
System firmware and BIOS are pre-installed. The following table lists all preinstalled firmware components and their versions.
Firmware component |
Version |
Details |
|---|---|---|
IFWI |
PVC2_1.23335 |
preinstalled |
AMC Firmware |
PVC_AMC_V_6.7.0.0 |
preinstalled |
System Firmware |
SE5C741.86B.01.01.0004.2303280404 |
preinstalled |
Software components are expected to be installed by the end user. Systems were tested with the following components:
Software component |
Version |
Details |
|---|---|---|
OS |
Ubuntu* 22.04 LTS (Jammy) |
5.15 kernel |
GPU Driver |
2328 Production Release |
|
Intel® oneAPI Base toolkit |
2023.2.0-49384 |
|
Intel® oneAPI HPC toolkit |
2023.2.0-49438 |
|
Intel® oneAPI AI toolkit |
2023.2.0.48997 |
|
Intel® XPU Manager |
xpu-smi 1.2.21 |
|
Workload: DGEMM |
- |
|
Workload: BabelSTREAM |
- |
|
Workload: BERT Large |
- |
Driver kernel build versions are frequently updated to enhance security and fix bugs. DKMS patches rely on matching the kernel branch, not the minor build number. For example, with the kernel package 5.15.0-76-generic, only the 5.15 branch is required; the specific 0-76 build number is not a concern. Intel releases are regularly validated with the latest OSV builds, ensuring compatibility with any Ubuntu 5.15 build.
Setting up BIOS
Follow these steps to configure the required BIOS settings for full performance of ML and AI workloads.
Enter BIOS [F2] and load default values [F9] to align with the validated setup.

Note
All the settings covered in this setup are defaults. No changes are necessary if the defaults are already applied. The following steps will verify that the expected settings are in use.
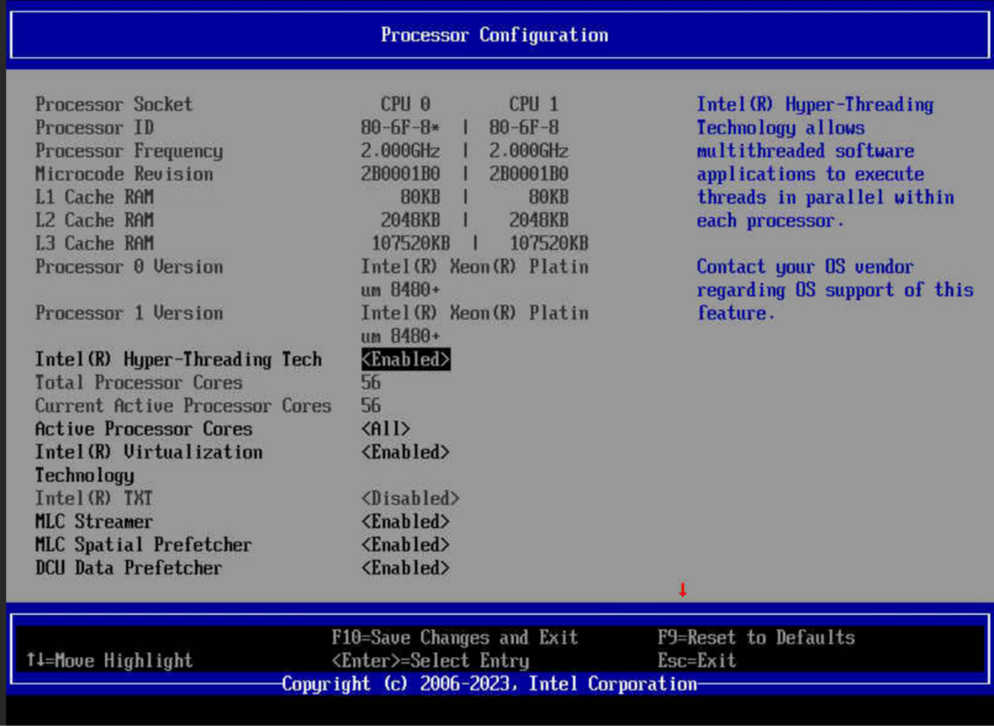
Open the
Advancedoptions and verify theProcessor Configuration.
Enable Intel® Hyper-Threading Tech (Intel® Hyper-Threading Technology). This feature is used for improving the Instructions per Cycle (IPC).
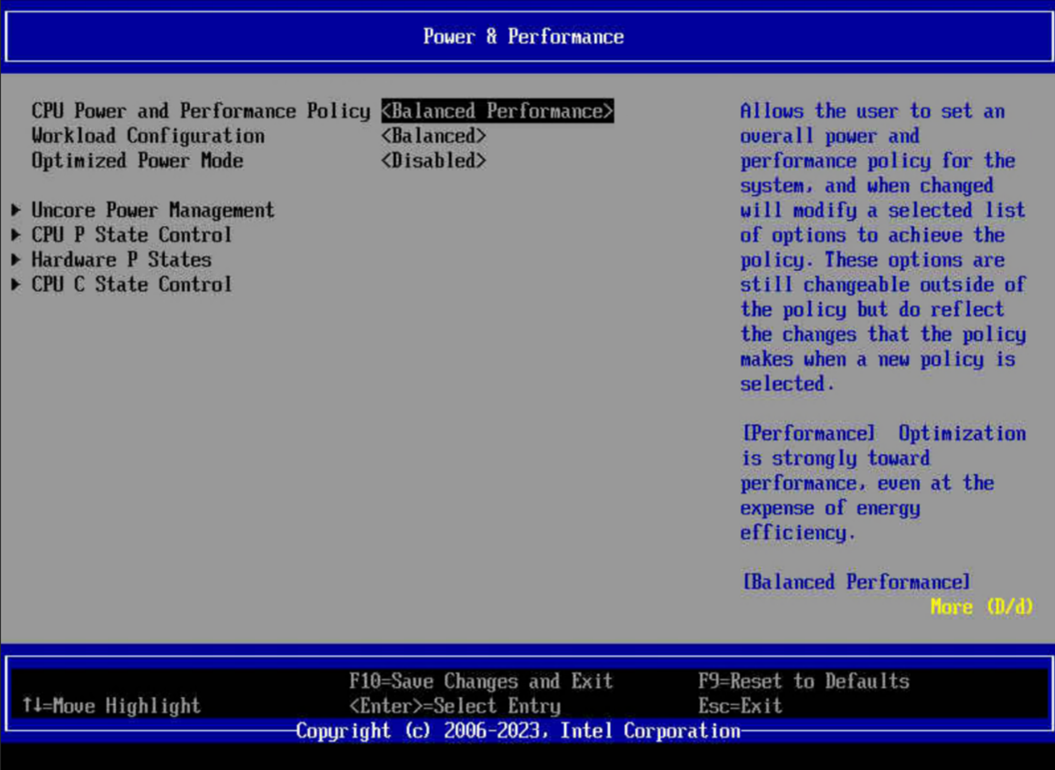
Open the
Advancedoptions and verify thePower & Performancesettings. Choose theBalanced Performanceoption. This setting weights optimization toward performance while conserving energy.
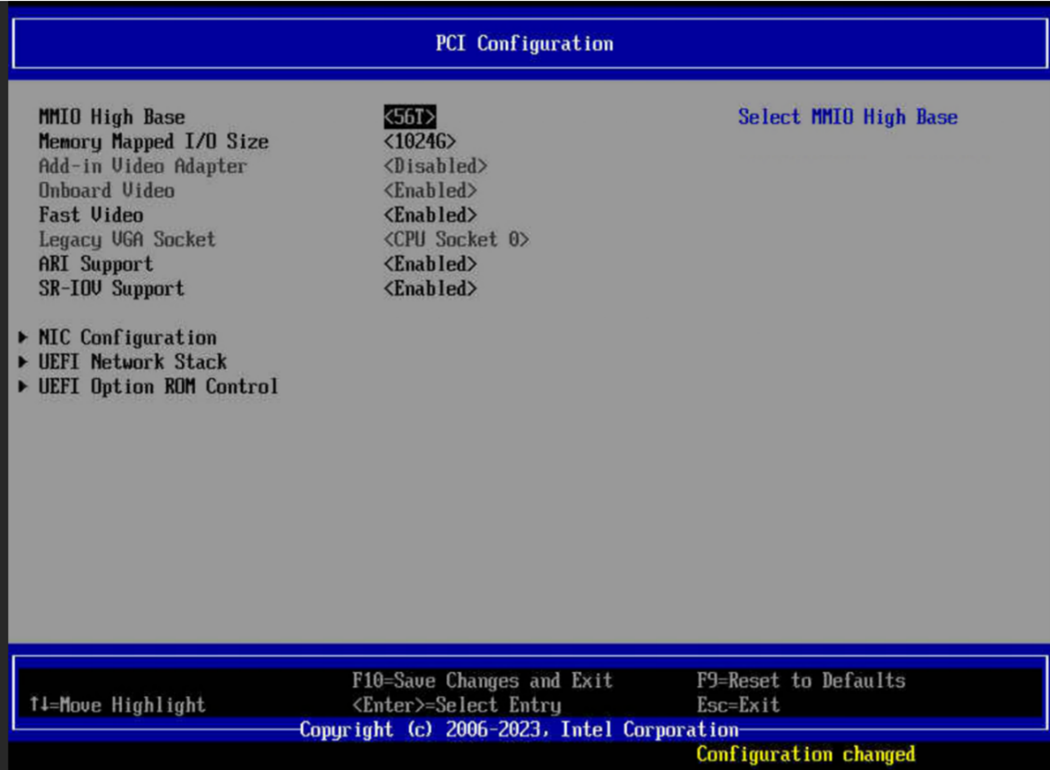
Open the
Advancedoptions and verify thePCI configurationsettings. SetMMIO High Baseto56Tfor MMIO optimization. SetMemory Mapped I/Osize to1024G.
Installing Ubuntu 22.04 and the GPU driver
We recommend using the Ubuntu 22.04 Server (Jammy). Although the installation steps for RHEL* and SLES* should also work, the following steps have been verified with the Intel® Server Board D50DNP and Intel® Data Center GPU Max 1100 Series.
Download Ubuntu 22.04 LTS from the Ubuntu website.
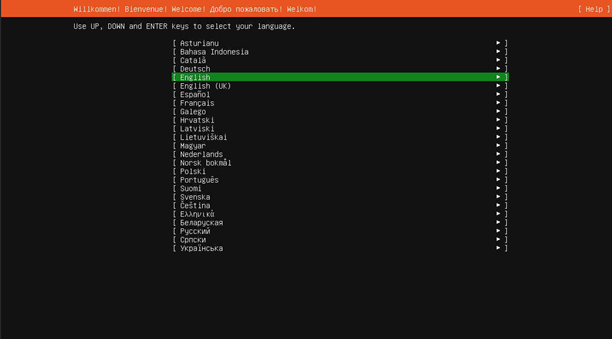
Start Ubuntu 22.04 LTS x86_64 installation, press F6 to select boot device, for example, USB.
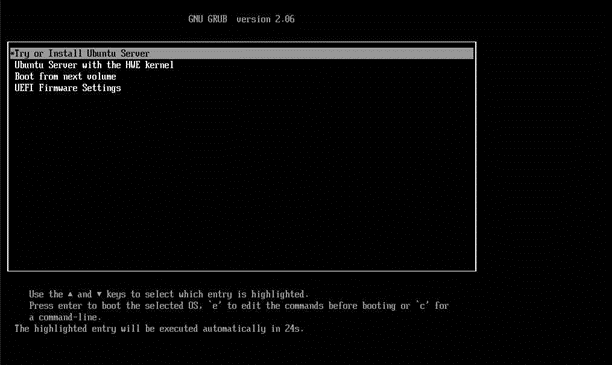
Select the following settings:
Note
Internet access is required for the following steps. Add a proxy server address if needed.
Language:
Ubuntu Serveras the base for the installation: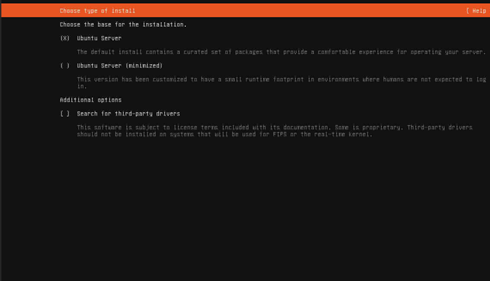
Use an entire diskas the storage configuration. At least 650 GB is required to execute all the validation workloads.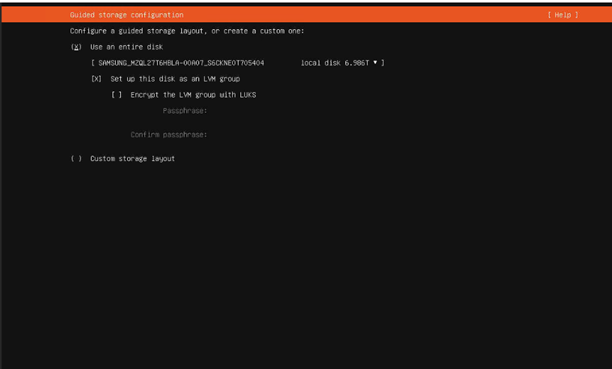
Accept the default options and create a user. To match the steps in this document, set up ‘user1’.
Select
Install OpenSSH server, which is disabled by default, to enable remote SSH login and SCP to the server.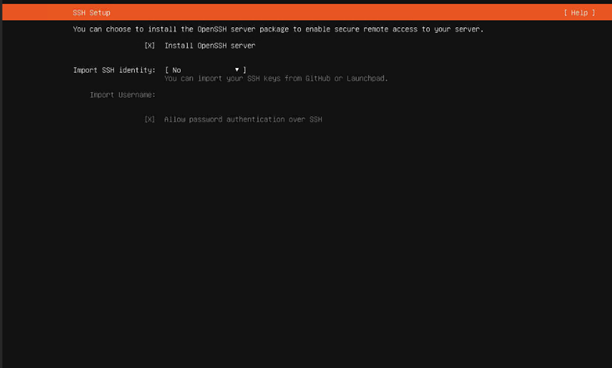
Wait for installation to finish, remove installation media, and then log in.
Check whether 5.15.0-xx-generic kernel is loaded.
uname -r
Example output:
5.15.0-84-generic
Kernel driver build versions are frequently updated for security and bug fixes. DKMS patches depend on matching the kernel branch, not the minor build number. For example, with the kernel package 5.15.0-76-generic, only the 5.15 branch is required; the specific 0-76 build number is not important. Intel releases are regularly validated with the latest OSV builds, so any Ubuntu 5.15 build is expected to work.
Follow the driver installation steps to install the latest production driver, including compute and media runtimes and development packages.
Update the boot loader options by adding
pci=realloc=offand disabling hang check toGRUB\_CMDLINE\_LINUX\_DEFAULTin/etc/default/grub.sudo vi /etc/default/grub GRUB_CMDLINE_LINUX_DEFAULT="… i915.enable_hangcheck=0 pci=realloc=off" sudo update-grub
Reboot the system.
sudo reboot
If Secure Boot is enabled in the BIOS, you might see a prompt during the reboot. Ensure you select
Enroll MOKto allow the new kernel to take effect.List the group assigned ownership of the render nodes and the groups you are a member of:
stat -c "%G" /dev/dri/render*
groups ${USER}
If a group is listed for the render node but not for the user, add the user to the group using gpasswd. The following command adds the active user to the render group and spawns a new shell with that group active:
sudo gpasswd -a ${USER} render
newgrp render
Verify the device is working with the i915 driver.
$ sudo apt-get install hwinfo
$ hwinfo --display
Example output for each Max 1100 card:
...
274: PCI 2900.0: 0380 Display controller
  [Created at pci.386]
  Unique ID: W2eL.+ER_Ec9Ujm4
  Parent ID: wIUg.xbjkZcxCQYD
  SysFS ID: /devices/pci0000:26/0000:26:01.0/0000:27:00.0/0000:28:01.0/0000:29:00.0
  SysFS BusID: 0000:29:00.0
  Hardware Class: graphics card
  Model: "Intel Display controller"
  Vendor: pci 0x8086 "Intel Corporation"
  Device: pci 0x0bda
  SubVendor: pci 0x8086 "Intel Corporation"
  SubDevice: pci 0x0000
  Revision: 0x2f
  Driver: "i915"
  Driver Modules: "i915"
  Memory Range: 0x3afe3f000000-0x3afe3fffffff (ro,non-prefetchable)
  Memory Range: 0x3a7000000000-0x3a7fffffffff (ro,non-prefetchable)
  IRQ: 787 (341 events)
  Module Alias: "pci:v00008086d00000BDAsv00008086sd00000000bc03sc80i00"
  Driver Info #0:
    Driver Status: i915 is active
    Driver Activation Cmd: "modprobe i915"
  Config Status: cfg=new, avail=yes, need=no, active=unknown
  Attached to: #210 (PCI bridge)
Perform a smoke test on the compute stack. This is not a comprehensive test; it only verifies that the GPU OpenCL runtime can be loaded. Additional tests are required to ensure full functionality.
clinfo -l

Platform #0: Intel(R) OpenCL Graphics
 +-- Device #0: Intel(R) Data Center GPU Max 1100
  -- Device #1: Intel(R) Data Center GPU Max 1100
Update the device name.
The new GPU name:
sudo /sbin/update-pciids
lspci |grep Display

9a:00.0 Display controller: Intel Corporation Ponte Vecchio XT (1 Tile) [Data Center GPU Max 1100] (rev 2f)
ca:00.0 Display controller: Intel Corporation Ponte Vecchio XT (1 Tile) [Data Center GPU Max 1100] (rev 2f)
Previous GPU name:
lspci |grep Display

9a:00.0 Display controller [0380]: Intel Corporation Device [8086:0bda] (rev 2f)
ca:00.0 Display controller [0380]: Intel Corporation Device [8086:0bda] (rev 2f)
Example workloads
The following workloads have been validated with this Max 1100 configuration:
Documentation for each workload contains steps describing the installation of the necessary oneAPI toolkits.
Intel® Xe link setup
The Intel® Data Center GPU Max 1100 can run in one, two, or four card configurations. Two and four card configurations can use Intel® Xe link connections for direct all-to-all card-to-card communication.
Disabling and enabling the Xe link
To disable and enable Xe Link, simply turn IAF on or off.
Disabling IAF:
$ sudo su
$ timeout --signal=SIGINT 5 modprobe -r iaf
$ modprobe -r iaf
$ for i in {0..1}; do cat /sys/class/drm/card$i/iaf_power_enable ; done;
$ for i in {0..1}; do echo 0 > /sys/class/drm/card$i/iaf_power_enable ; done;
$ for i in {0..1}; do cat /sys/class/drm/card$i/iaf_power_enable ; done;
Enabling IAF:
$ sudo su
$ for i in {0..1}; do cat /sys/class/drm/card$i/iaf_power_enable ; done;
$ for i in {0..1}; do echo 1 > /sys/class/drm/card$i/iaf_power_enable ; done;
$ for i in {0..1}; do cat /sys/class/drm/card$i/iaf_power_enable ; done;
modprobe iaf
Setting ptrace_scope to 0:
$ sysctl -w kernel.yama.ptrace_scope=0
Verifying Xe link status
To verify Xe link status, use the XPU manager.
Checking the status:
$ xpu-smi config -d 0
When enabled, available Xe link ports are displayed.

Check the number of Xe link ports and lanes per Xe link port: 6 ports and 4 lanes:
$ xpu-smi discovery -d 0

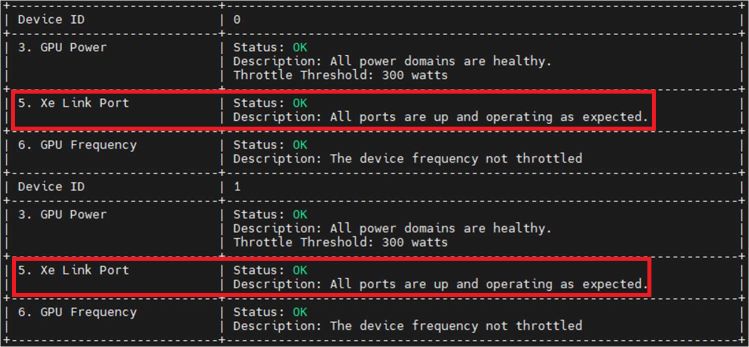
Check Xe link health status:
$ xpu-smi health -l -c 5
Xe link bandwidth test
Accessing remote memory using IPC can be tested with Intel MPI.
The following command runs a simple Intel MPI test using Xe link to check bandwidth.
Before trying this command, install oneAPI base and HPC toolkits as described in Matrix Multiply (DGEMM) example GPU workloads instructions.
$ source /opt/intel/oneapi/setvars.sh
$ env I_MPI_OFFLOAD=1 mpirun -n 2 IMB-MPI1-GPU pingpong sendrecv -mem_alloc_type device -msglog 28
Tools
This section describes the available tools available that can help with application development and optimization.
Intel® XPU Manager
Intel® XPU Manager is a free and open-source tool for monitoring and managing Intel Data Center GPUs. It is designed to simplify administration, maximize reliability and uptime, and improve utilization.
For more information, see Intel® XPU System Management Interface User Guide.
GDB – PVC debugger
GDB is installed on the machine as a part of the oneAPI base toolkit, so no extra step is needed to use it.
The following configuration is required to debug GPU using GDB. It is a one-time requirement on the system.
Prerequisite steps Before setting up the GDB debugger, follow these steps.
Add the following two variables to
GRUB_CMDLINE_LINUX_DEFAULT=""in/etc/default/grub"i915.debug_eu=1 i915.enable_hangcheck=0".$ sudo vi /etc/default/grub GRUB_CMDLINE_LINUX_DEFAULT="i915.debug_eu=1 i915.enable_hangcheck=0" $ sudo update-grub $ sudo reboot
Disable preemption timeout on GPU.
$ ACTION=="add|bind",SUBSYSTEM=="pci",DRIVER=="i915",RUN+="/bin/bash -c
'for i in /sys/$DEVPATH/drm/card?/engine/[rc]cs*/preempt_timeout_ms; do
echo 0 > $i; done'"
$ udevadm trigger -s pci --action=add
Ensure preemption timeout is set correctly.
$ find /sys/devices -regex '.*/drm/card[0-9]*/engine/[rc]cs[0-9]*/preempt_timeout_ms' -exec echo {} \; -exec cat {} \;Set up GDB debugger.
$ source /opt/intel/oneapi/setvars.sh
$ export ZET_ENABLE_PROGRAM_DEBUGGING=1
$ python3 /path/to/intel/oneapi/diagnostics/latest/diagnostics.py --filter debugger_sys_check --force
Compile the program.
$ mkdir array-transform
$ cd array-transform
$ wget https://raw.githubusercontent.com/oneapi-src/oneAPIsamples/master/Tools/ApplicationDebugger/arraytransform/src/array-transform.cpp
$ icpx -fsycl -g -O0 array-transform.cpp -o array-transform
$ export ONEAPI_DEVICE_SELCTOR=level_zero:0
$ gdb-oneapi array-transform
FRun GBD from the GDB console.
(gdb) run
Reference output:
Starting program: /home/user1/workload/array-transform/array-transform
[Thread debugging using libthread_db enabled]
Using host libthread_db library "/lib/x86_64-linux-gnu/libthread_db.so.1".
[New Thread 0x7fffca416640 (LWP 46007)]
[Thread 0x7fffca416640 (LWP 46007) exited]
[New Thread 0x7fffc9a15640 (LWP 46008)]
[Thread 0x7fffc9a15640 (LWP 46008) exited]
intelgt: gdbserver-ze started for process 46004.
[New Thread 0x7fffc8ff4640 (LWP 46023)][SYCL] Using device: [Intel(R) Data Center GPU Max 1100] from [Intel(R) Level-Zero]
success; result is correct.
[Thread 0x7fffc8ff4640 (LWP 46023) exited]
[Inferior 1 (process 46004) exited normally]
Detaching from process 1
[Inferior 2 (device [9a:00.0]) detached]
Detaching from process 2
[Inferior 3 (device [ca:00.0]) detached]
intelgt: inferior 2 (gdbserver-ze) has been removed.
intelgt: inferior 3 (gdbserver-ze) has been removed.
Quit GDB console.
(gdb) quit
Intel® VTune™ Profiler
This section describes how to use Intel® VTune™ Profiler with a DGEMM workload to analyze the performance of the Intel GPU MAX 1100.
The following steps assume the working directory is /home/user1/workload/benchmark/DGEMM. See DGEMM workload for setup steps.
Test setup:
$ sudo su
$ source /opt/intel/oneapi/setvars.sh
$ cd /home/user1/workload/benchmark/DGEMM
$ export ONEAPI_DEVICE_SELECTOR=level_zero:0
$ /dgemm.mkl
In your system configuration, you should not see any error message, such as “Failed to start profiling because the scope of the ptrace() system call application is limited.” However, if you encounter this error, set the value of the kernel.yama.ptrace_scope sysctl option to 0 with the following command:
$ sysctl -w kernel.yama.ptrace_scope=0
For more information, see the Intel® VTune™ Profiler User Guide.
VTune is a component of oneAPI Base Toolkit, so no additional installation is required. Run it using the following command. For a detailed description of the parameters, refer to the VTune User Guide.
$ vtune -collect gpu-hotspots -k characterization-mode=overview -k collect-programming-api=true -data-limit=0 --duration 20 -- ./dgemm.mkl
Support for loaned systems
If you need support during the sample period, either submit a service request or call the customer support center.
Submitting service requests
Flow these steps to submit a service request.
Log in to the support portal.
Select Intel® Data Center GPU Max 1100 and choose Create Request.
Describe your issue on the next screen and select Check For Answers.
Choose Continue to Request Creation.
Provide answers to additional questions and click Submit Request.
A confirmation window will appear informing you a new case number has been created. You can expect a response within 24 hours.
Call the customer support center
The customer support center is open Monday to Friday from 8 AM to 5 PM PST. To reach the center, please call: (+1) 855-816-1934.